Thin Stone Veneer Fireplace: A Professional Installation Guide
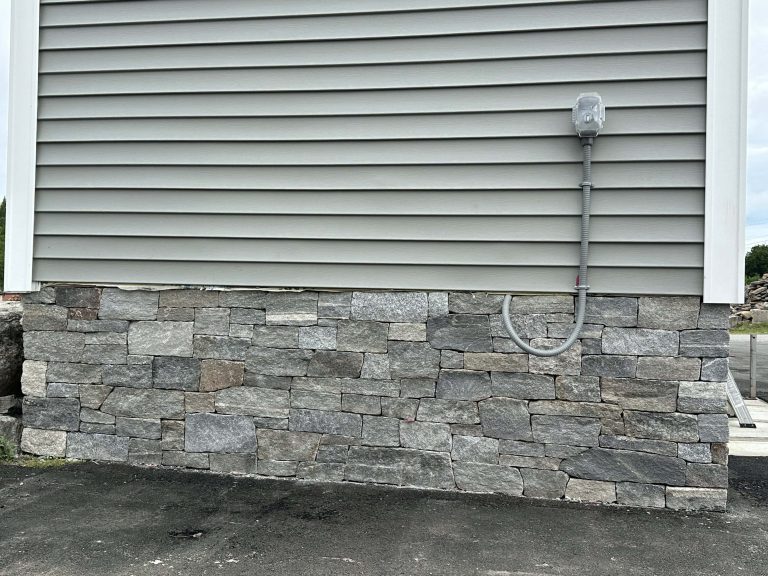
A thin stone veneer fireplace provides the authentic appearance and performance of a traditional masonry fireplace using real, natural stone sawn to approximately one inch thick. This engineered profile reduces weight, allowing installation over existing structures without requiring a new foundation or support ledge. It is the preferred choice for professionals on new construction and remodels, delivering a full-depth stone look with durability that manufactured products cannot match.
Why Real New England Stone Is the Professional Choice
For a fireplace application, material authenticity and long-term performance are critical. A fireplace is a permanent architectural feature, and the material selected will define the space for decades.
Stoneyard’s thin stone veneer is not a cast concrete product. It is 100% real fieldstone or quarried stone, sourced from New England and crafted at our facility in Littleton, Massachusetts.
Each piece is hand-sorted and sawn to a thickness of ¾–1¼ inches. This process preserves the stone’s genuine color, texture, and structural integrity while significantly reducing its weight. This makes it ideal for vertical surfaces like fireplaces, allowing it to be installed over masonry, concrete, or properly prepared framed walls without requiring structural reinforcement.
Unmatched Durability and Authentic Heritage
Unlike cement-based products from brands like Eldorado Stone, Coronado Stone, or Cultured Stone, the color in our real stone veneer is integral to the material. It will never fade, flake, or peel. This is a critical performance factor for fireplaces, where repeated heating and cooling cycles can cause manufactured materials to deteriorate.
All Stoneyard products are Harsh Climate Approved (HCA), meaning they are tested and proven to handle extreme freeze–thaw cycles. That same durability ensures your thin stone veneer fireplace will perform for decades, withstanding high heat from the firebox with minimal maintenance. Natural New England stone veneer delivers multi-decade performance with minimal maintenance and no color fading.
The geology behind the stone is as important as its performance. These stones reflect the unique character of New England, bringing authentic regional craftsmanship into a residential or commercial project. Sourcing locally from our Littleton, MA facility also supports sustainable production with a low transportation impact.
A Clear Advantage Over Manufactured Stone
Manufactured stone is designed to imitate real stone, but it is a fundamentally different material. Cast from molds using cement and artificial pigments, it lacks the density, unique character, and long-term stability of genuine quarried stone.
The real-world performance differences are significant for a permanent installation like a fireplace.
Table: Natural Stone vs. Manufactured Stone for Fireplaces
| Attribute | Stoneyard Natural Thin Veneer | Manufactured Stone (Eldorado, Cultured Stone) |
|---|---|---|
| Material Composition | 100% real, quarried New England stone | Cement, aggregates, and artificial color pigments |
| Color Permanence | Color is natural and runs through the entire stone; will not fade. | Surface-applied color that can fade from heat or wear off. |
| Durability | Extremely dense and durable. Harsh Climate Approved (HCA). | Porous and can absorb water, leading to cracking/spalling. |
| Authenticity & Texture | Each piece is unique. No repetitive patterns. | Made from molds, which can create noticeable pattern repeats. |
| Heat Resistance | Excellent. Proven to withstand high temperatures for decades. | Can deteriorate or discolor over time with repeated heat exposure. |
| Maintenance | Minimal; occasional cleaning. | May require sealing; chips reveal concrete underneath. |
For a project as central as a fireplace, the authentic durability and timeless appearance of real stone deliver greater long-term value.
Fireplaces are a key application driving the American stone veneer market, which reached $675.7 million in 2023 and is projected to climb to $974.2 million by 2032, according to Fortune Business Insights. Real thin stone veneer provides the high-value, authentic aesthetic that clients demand in both residential and commercial projects.
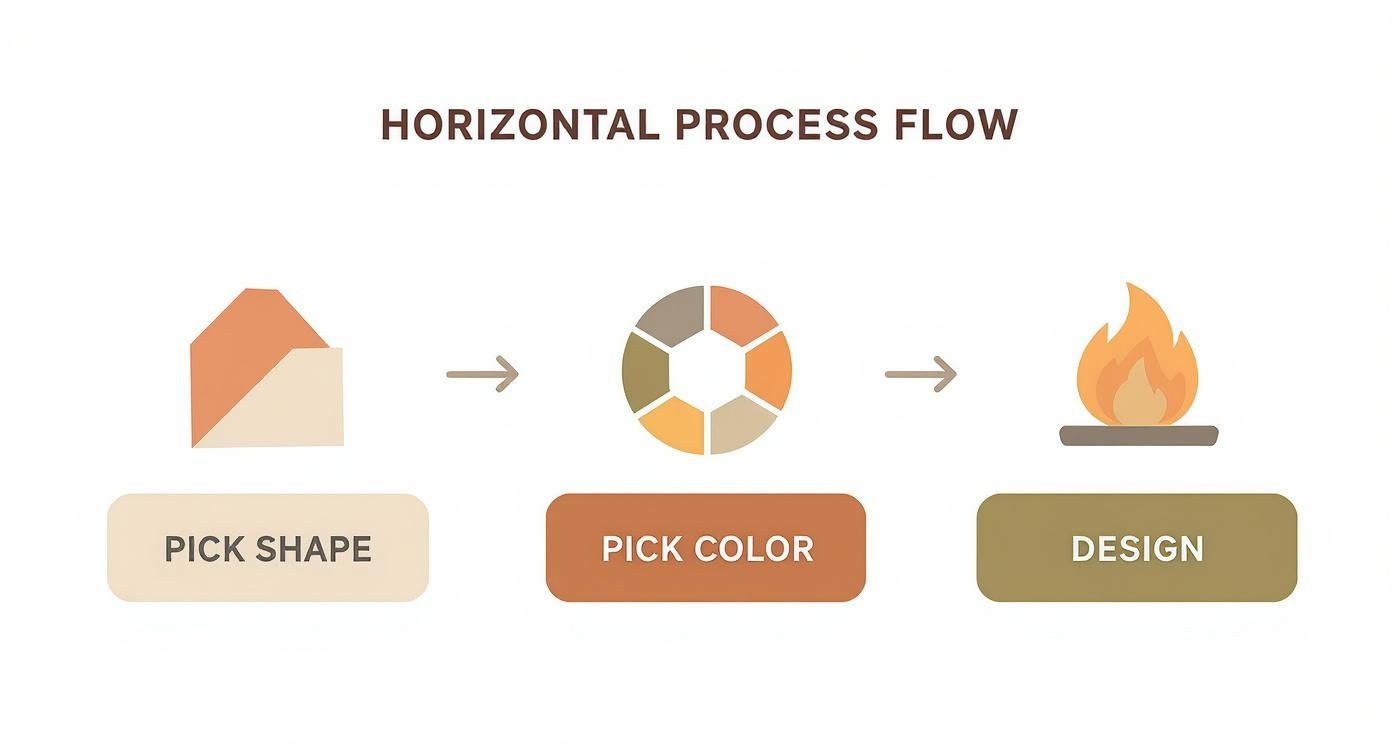
Choosing the Right Stone Shape and Color
Designing a thin stone veneer fireplace involves two key decisions: the stone shape and the color blend. These choices establish the architectural tone for the entire room, from modern and linear to rustic and traditional. Stoneyard works exclusively with 100% real New England stone, ensuring an authentic, permanent feature.
We offer five distinct stone shapes, each crafted to create a specific visual texture. Every stone is sawn to approximately one inch thick and is available with matching corner pieces. This is critical for allowing the veneer to wrap fireplace returns seamlessly, creating the full-depth appearance of solid masonry.
As you plan your fireplace design, reviewing current remodeling trends can provide context, helping you select a stone that aligns with both your design intent and long-term value.
Understanding Stone Shapes for Fireplace Design
The stone shape dictates the final pattern and joint style. A tight-fit Ledgestone provides a clean, stacked appearance, while a Mosaic pattern offers an organic look similar to a traditional fieldstone wall.
- Ledgestone: This shape consists of thin, linear strips of stone laid in tight horizontal rows. It is frequently specified for contemporary fireplaces where clean lines are a priority.
- Ashlar: Ashlar features the same rectilinear form as Ledgestone but with taller individual stones, creating a more substantial scale suitable for large living rooms or commercial lobbies.
- Square & Rectangular: This is a classic, timeless shape. It uses blocky, uniformly cut stones to create a traditional pattern often seen in colonial-style homes and civic buildings.
- Mosaic: With irregular, angular pieces, the Mosaic shape mimics a hand-laid fieldstone wall. It is the ideal choice for achieving the rustic, natural aesthetic found in farmhouses and lodges.
- Round: Made from weathered, glacial stones, this shape delivers an authentic historic character. It is suited for heritage restorations, lake homes, and classic farmhouse fireplace surrounds.
For a side-by-side view of these options, our stone veneer shapes comparison shows how each style performs in a real-world application.
Pairing Shapes with New England Color Collections
Once a shape is selected, the next step is choosing a color blend. Our five New England color collections are sourced from stone across the region, each reflecting its unique geology. The color is integral to the stone itself—not a surface coating—so it will never fade, even when exposed to direct heat from the fire.
Specific combinations of shape and color can define a project:
- Boston Blend® Ledgestone: Our signature mix of gray, tan, and brown paired with the clean lines of Ledgestone. It is highly adaptable and suits transitional to contemporary interiors.
- Colonial Tan Mosaic: The warm golds and browns of Colonial Tan combined with the irregular Mosaic shape create a rustic fireplace, ideal for a coastal home or mountain retreat.
- Greenwich Gray Ashlar: For a more sophisticated, modern aesthetic, the neutral gray of Greenwich Gray with the larger Ashlar format is a proven combination for commercial spaces like hotel foyers or upscale restaurants.
- Newport Mist Square & Rectangular: The soft gray and white tones of Newport Mist create a light, airy feel, while the Square & Rectangular shape maintains a classic, structured look.
- Vineyard Granite Round: To achieve an authentic New England historic look, the rugged gray-pink granite with its distinctive mica sparkle is cut into the Round shape. This is ideal for farmhouse renovations that demand heritage character.
By combining shape and color, you gain precise control over the final appearance of the fireplace. This is not simply product selection; it is the crafting of a lasting piece of architecture that is both authentic and built to perform.
How to Prepare Your Fireplace Substrate
Proper surface preparation is the most critical factor for a successful thin stone veneer fireplace installation. A durable, permanent bond depends on starting with a clean, stable, and correctly prepared substrate.
Following the correct preparation steps ensures the real stone veneer adheres properly and can handle the thermal fluctuations of a working fireplace for decades.
The required installation method depends on the substrate—whether new construction or a renovation. Stoneyard’s 100% natural stone veneer is sawn to approximately one inch thick, making it light enough for installation over several common surfaces without a structural brick ledge, provided the surface is solid.
Assessing Common Fireplace Substrates
Before mixing mortar, you must assess the existing surface. Different materials require different prep work to create a reliable foundation.
- Unpainted Masonry or Concrete Block: This is the ideal substrate. If the surface is clean, unsealed, and structurally sound, a polymer-modified setting mortar can often be applied directly. The surface must be free of dirt, efflorescence, or loose material.
- Painted or Sealed Surfaces: Paint or sealants are bond-breakers that prevent mortar adhesion. These surfaces must be mechanically abraded by sandblasting or grinding to expose the raw masonry. Alternatively, the surface can be covered with metal lath.
- Framed Walls (Drywall or Cement Board): Stone veneer cannot be applied directly to drywall or cement board. A standard wood or steel-framed wall requires a multi-step process: a weather-resistant barrier, metal lath, and a scratch coat. This creates a new masonry surface for the veneer.
A properly prepared substrate is non-negotiable for a professional-grade thin stone veneer fireplace. Omitting steps like applying lath over framed walls or failing to clean old brick will lead to bond failure.
Once the technical preparation is complete, you can proceed to stone selection.
Architectural choices are made after critical surface preparation is complete.
Applying Lath and a Scratch Coat
For any fireplace constructed with a wood or steel frame, applying metal lath and a scratch coat is mandatory. This process creates a new, thin concrete wall for the stone to bond to mechanically and chemically.
First, fasten a moisture barrier to the wall sheathing. Next, apply a galvanized, self-furring metal lath over the barrier, ensuring fasteners penetrate the studs according to local building codes. Overlap lath sheets correctly to create a continuous, strong surface.
With the lath secured, apply the “scratch coat”—a layer of Type S or N mortar troweled over the lath to fully embed the metal mesh. Then, score the surface horizontally with a notched trowel or scarifier rake to create a rough, grooved texture for the stone to grip.
This scratch coat must cure for at least 24 to 48 hours before setting stone. This curing time allows the mortar to gain the necessary strength to support the veneer’s weight. For more detail, see our guide on preparing the surface for stone veneer.
Mortar Consistency and Curing
The correct mortar mix is crucial, especially for a fireplace exposed to temperature changes. A high-quality, polymer-modified setting mortar provides superior bond strength and flexibility. Mix to a consistency of thick peanut butter—stiff enough to hold its shape on a trowel without slumping.
Curing is as important as mixing. After the scratch coat cures and the stone is installed, the final mortar must also cure slowly. Protect it from direct sunlight or forced air heat during the initial phase. Rapid drying can weaken the bond and lead to failure.
Always consult local building codes and the official Stoneyard Installation Guide to guarantee a safe, compliant, and professional result.
Installing Thin Stone Veneer on Your Fireplace
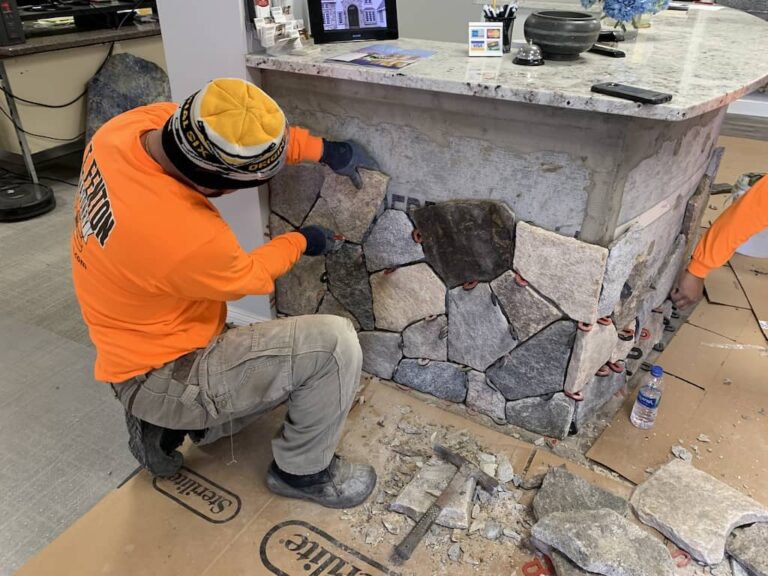
With a properly prepared surface, the installation process begins. A successful installation transforms individual stones into a cohesive fireplace that appears as if it were constructed from full-depth masonry. This requires careful planning, steady execution, and an eye for natural patterns.
Before mixing mortar, lay out the stone. Open several boxes of your Stoneyard thin stone veneer and arrange the pieces on a drop cloth. This “dry-fitting” stage is essential. It allows you to visualize the final pattern, blend colors and sizes, and create a balanced composition before committing a single stone to the wall.
Laying Out a Natural and Balanced Pattern
The key to professional-grade stone veneer work is avoiding uniformity. A natural stone wall should have no repeating patterns. During dry-fitting, focus on staggering joints and distributing unique “hero” stones—those with distinct colors or textures—across the entire surface. This prevents any single area from becoming too busy and creates a more appealing final product.
A common mistake is pulling stones from one box at a time. Always blend pieces from multiple boxes. This ensures the natural color variations in stone like our Boston Blend® or Colonial Tan are evenly distributed. It is a critical step that distinguishes professional work.
Think of it as assembling a puzzle where you create the final image. The goal is to fit the pieces together in a way that feels completely natural, like a historic New England fieldstone wall.
Setting the Stone and Managing Joints
With the layout planned, you can begin setting the stone. Apply a consistent layer of polymer-modified mortar to the back of each piece, a technique known as “back-buttering.” A mortar bed of approximately ½ inch thick ensures full coverage. Press each stone firmly onto the scratch coat with a slight twisting motion to set it securely and eliminate air pockets.
Joint spacing is a key design element and depends on the chosen stone shape.
- Ledgestone & Ashlar: Often installed “tight-fit” or “dry-stacked,” with stones placed very close together and minimal visible mortar for a clean, modern aesthetic.
- Square & Rectangular: These stones typically look best with a standard ⅜ to ½ inch joint, allowing for a traditional grouted look that highlights the geometry of each piece.
- Mosaic & Round: The organic forms of these shapes require wider, more variable joints. Here, the mortar becomes part of the design, contributing to a rustic, hand-laid appearance.
For general installation principles that apply here, including substrate prep, review these professional tiling installation techniques.
The Critical Role of Corner Pieces
The key to making thin veneer look like a full-depth stone structure is using matching corner pieces. Stoneyard provides 90-degree corners for every stone shape and color. These L-shaped pieces wrap around the outside edges of the fireplace, concealing the veneer’s thickness.
Always begin installation by setting the corners first. Work your way up, alternating the long and short legs of the L-shaped pieces. This establishes the project boundaries and is essential for achieving an authentic, solid-stone appearance. Omitting this step compromises the realism of the installation.
Be prepared to make cuts. You will likely need to trim stones with a diamond blade on an angle grinder or wet saw for a precise fit, especially around the firebox opening, mantel, or outlets. These adjustments are a hallmark of true craftsmanship and significantly impact the final quality.
Finishing Touches: Grout, Mantels, and Hearths
The final stages of a stone fireplace project—grouting and installing the mantel and hearth—define its character. While the stone veneer provides the groundwork, these finishing touches integrate the fireplace into the surrounding architecture.
Grouting locks in the final look, and the technique used can dramatically alter the project’s appearance. Stoneyard veneer is 100% natural New England stone, and the grouting method should complement its authentic color and texture.
Selecting the Grouting Technique
Grout does more than fill gaps; it frames each stone and establishes the overall style. For thin stone veneer fireplaces, two main approaches produce distinct visual outcomes.
- Standard Joint Grouting: The joints are filled so the grout is nearly flush with the stone face. This creates a clean, defined look that highlights the individual shapes, making it a good match for Square & Rectangular or Ashlar patterns. The joint is typically “struck” or tooled for a smooth, concave finish.
- Overgrouting (or Full Tooled Joint): This technique reflects historic masonry, where mortar was applied more generously to cover the stone edges. The result is a softer, rustic appearance that blends the stone and mortar lines. Overgrouting is an excellent choice for Round and Mosaic shapes to enhance their old-world, fieldstone character.
For color, a neutral gray or buff grout is typically best. It allows the natural tones of the stone—such as the grays and tans in Boston Blend® or the warm golds of Colonial Tan—to remain the focus.
Integrating the Mantel and Hearth
The mantel and hearth are major design elements. They must be integrated securely and aesthetically with the stone veneer, and material selection provides an opportunity to add complementary textures and colors.
A well-chosen mantel and hearth should feel like a natural extension of the fireplace, not an afterthought. Whether you opt for reclaimed timber, local granite, or classic bluestone, the material should honor the authentic character of the New England stone.
Common material choices include:
- Reclaimed Wood: A heavy timber beam adds a warm, rustic contrast that pairs well with stone. Ensure it is installed with proper clearance from the firebox opening to meet local building codes.
- Natural Stone Slabs: For a durable and elegant solution, a solid piece of granite, soapstone, or bluestone is ideal for both the mantel and hearth. These materials are non-combustible and provide a clean finish.
- Cast Concrete: For a contemporary or industrial aesthetic, a custom-cast concrete mantel or hearth can be formed to any dimension. It offers a sleek counterpoint to the organic texture of the stone.
Best Practices for Secure Installation
Proper installation of these elements is non-negotiable for safety and longevity. Hearths must be set on a solid, level bed of mortar for full support to prevent cracking. The hearthstone is typically installed first, providing a level base from which to start laying the stone veneer.
Heavy mantels require robust support. They should be fastened directly to the wall framing with lag bolts or specialized mounting brackets before the stone veneer is installed. This ensures the structure, not the veneer, bears the weight. The stone is then cut and fitted around the mantel supports for a seamless, integrated look.
Careful planning of these finishing details ensures your thin stone veneer fireplace is not only built to last but also achieves a professional, architecturally complete appearance.
Fireplace Installation: Technical FAQs
Even experienced professionals have questions when beginning a thin stone veneer fireplace project. Here are direct answers to common queries we receive at our Littleton, MA facility, based on our work with real New England stone.
Can Thin Stone Veneer Be Installed Over an Existing Brick Fireplace?
Yes, in most cases, Stoneyard’s real thin stone veneer can be installed directly over a clean, solid brick surface. Proper preparation is essential. The brick must be free of paint, grime, efflorescence, or loose material that could compromise the bond.
For best results, use a high-quality, polymer-modified mortar. If the brick is painted or in poor condition, the professional standard is to cover the entire surface with metal lath and a scratch coat. This creates a new, ideal substrate for installation.
How Does Real Stone Handle High Heat?
Natural stone is inherently suited for high-heat applications. Stoneyard’s thin veneer is 100% real New England stone, making it naturally non-combustible and capable of withstanding high temperatures. It does not face the risks of discoloration or degradation common with manufactured concrete products from brands like Eldorado Stone or Cultured Stone.
All our stone is Harsh Climate Approved (HCA), a testament to its performance in extreme freeze–thaw cycles. That same geological density ensures your fireplace surround will withstand intense heat from the firebox for its entire lifespan without fading, cracking, or spalling.
Comparing Weight to Full-Bed Stone Fireplaces
The weight reduction is a significant advantage of thin veneer. Our product weighs less than 15 lbs per square foot. In comparison, traditional full-bed stone can exceed 45 lbs per square foot.
This weight difference is a critical factor in both new construction and remodels. It eliminates the need for the costly structural foundation or brick ledge required for full-depth stone. A thin stone veneer fireplace can be safely installed on standard framed walls, making it a versatile solution for nearly any project.
How to Calculate Stone Needed for a Project
Accurate material calculation prevents delays and waste. The process is straightforward:
- Calculate Flats: Measure the total area of the fireplace face (Height x Width) in square feet. Subtract the area of the firebox opening. This is your total square footage for flat pieces.
- Calculate Corners: Measure the total length of all outside corners in linear feet. This determines the linear feet of corner pieces required. Corner pieces are essential for achieving the look of a full-depth stone fireplace.
For the most accurate calculation, use our online Thin Veneer Material Calculator. It is designed to help you order the correct amount of flats and corners for your specific project.
Explore the full Stoneyard Thin Stone Veneer Collection — real New England stone, made in the USA.
Order free samples at https://stoneyard.com/stone-samples/ or schedule a virtual showroom visit at https://stoneyard.com/contact/.