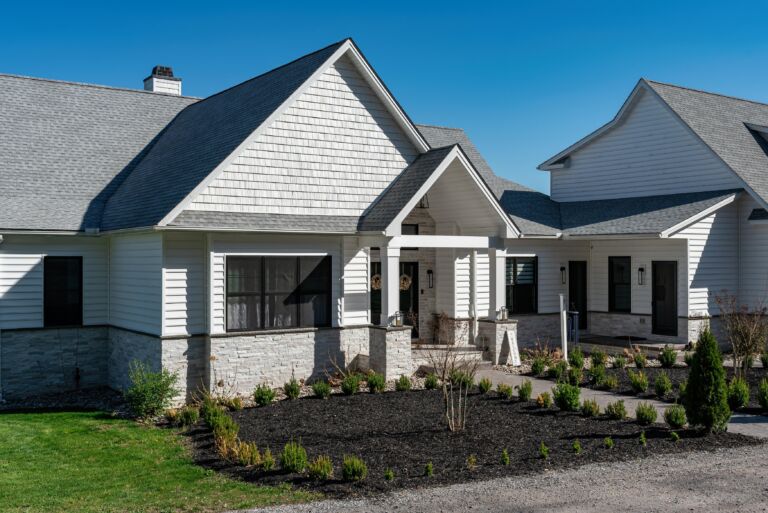
DIY Fireplace Stone: A Guide to Using Natural Thin Veneer
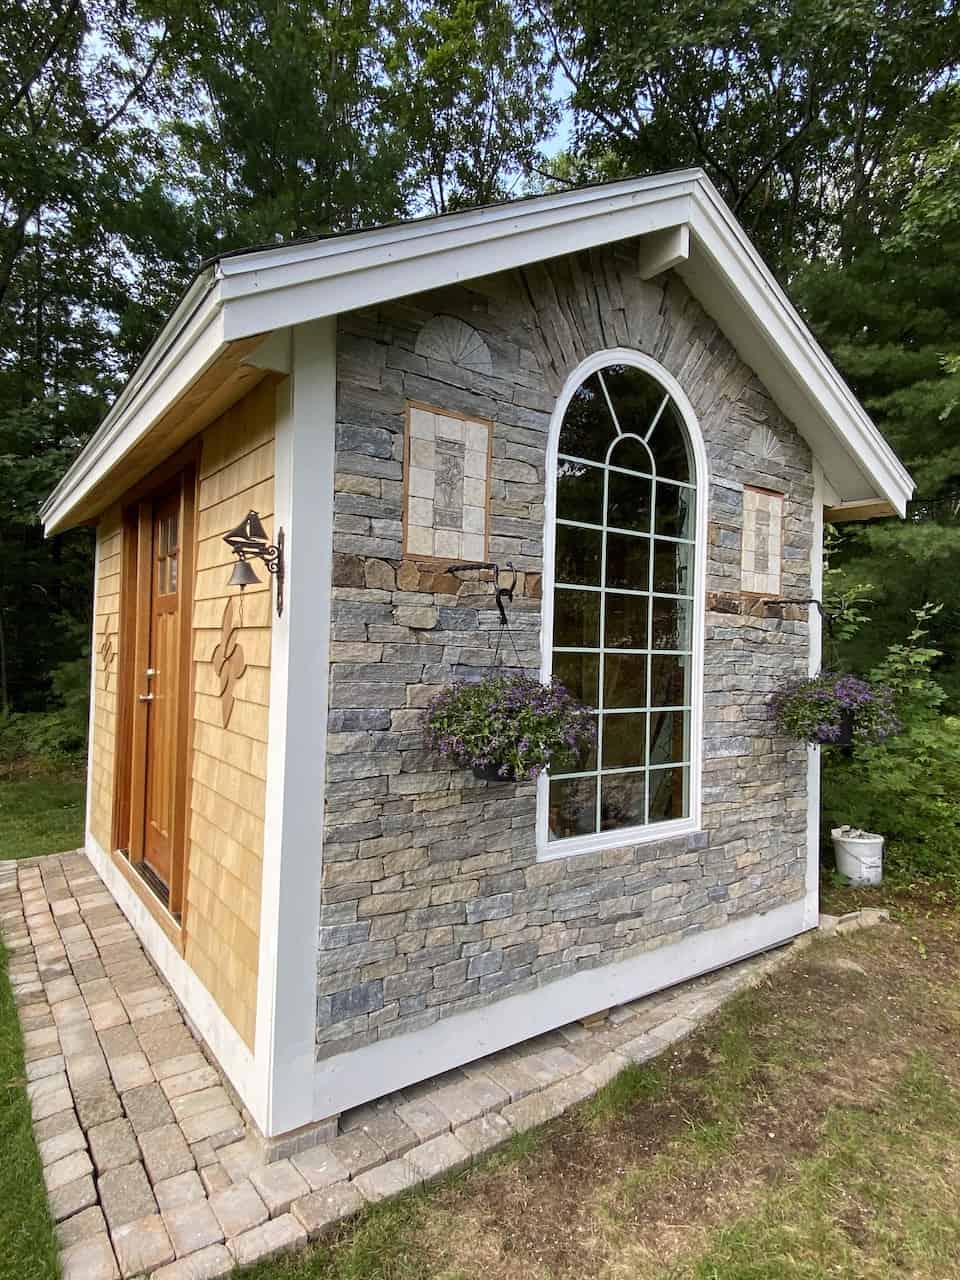
Homeowners can achieve a professional, mason-quality finish on a DIY fireplace stone project by using real New England natural thin stone veneer from Stoneyard. This is not a faux concrete product, but 100% natural quarried stone, sawn thin at our Littleton, MA facility to make it manageable for a hands-on project. Using authentic thin stone veneer provides a permanent architectural upgrade without the complexity and weight of full-bed masonry.
Why Real Stone Veneer is the Right Call for a DIY Fireplace
The image above showcases the variety of real thin stone veneer crafted at our Littleton, MA facility, all sourced from our own New England quarries. This range of authentic stone allows for precise matching to any architectural style, from rustic to contemporary.
A common misconception is that a real stone fireplace requires specialized crews and major structural modifications. While true for traditional full-bed building stone, New England thin stone veneer changes the scope of the project entirely.
Each piece of stone is sawn to a thickness of approximately ¾–1¼ inches. This process dramatically reduces the material’s weight, making it easier to handle, cut, and install. This brings a genuine stone fireplace within reach for a skilled DIYer.
The Advantage of Thin Veneer: DIY vs. Hiring a Mason
The reduced weight of thin stone veneer is a significant advantage for a DIY project. It eliminates the need to pour a structural support ledge or reinforce the foundation, which are mandatory for full-bed stone. The material’s manageable profile simplifies installation over existing masonry or properly prepared framed walls.
This means Stoneyard thin veneer can be installed directly over surfaces like:
- An existing, structurally sound brick fireplace
- Poured concrete walls
- Properly prepared framed walls using metal lath and a scratch coat
This flexibility allows for a complete transformation of an outdated fireplace without demolition. The project shifts from heavy construction to a focus on precise layout and mortar application. Learn more about the process in our guide on how to add thin veneer to a fireplace.
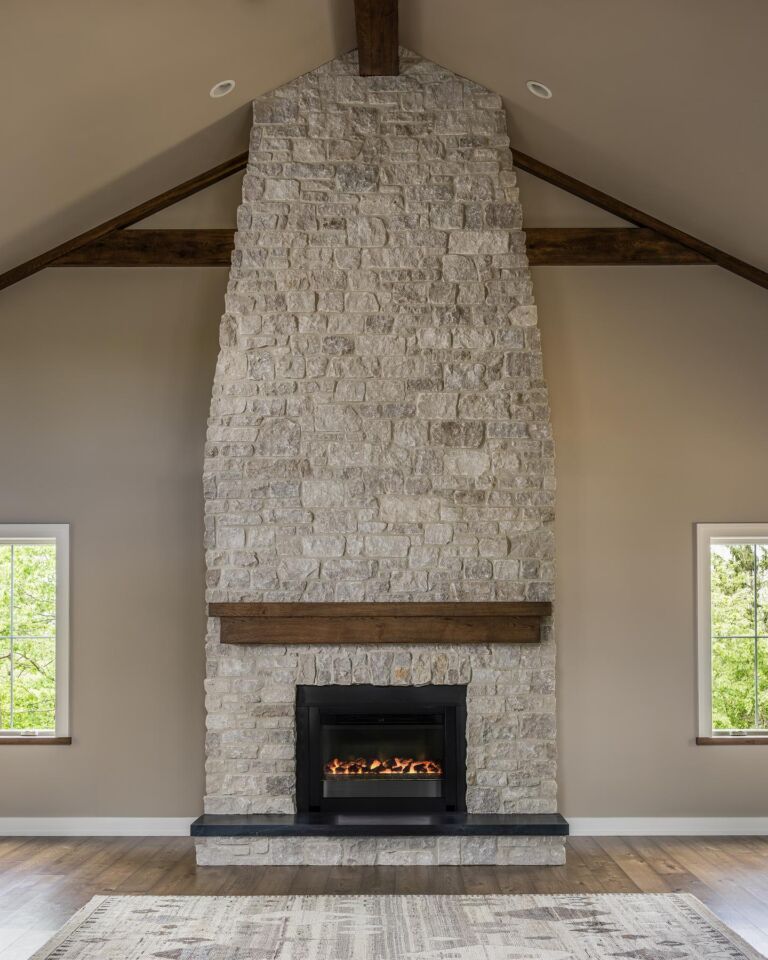
The key takeaway: You achieve the authentic, full-depth look of traditional masonry. When our matching corner pieces are used, the veneer wraps around edges seamlessly, making it indistinguishable from a full-bed stone installation.
Authenticity and Performance vs. Faux Stone
It is critical to understand the difference between Stoneyard’s real natural stone and manufactured or “faux” stone products from brands like Eldorado Stone or Cultured Stone. These products are cement-based veneers, cast in molds and tinted with pigments to imitate stone. While the installation process is similar, the long-term performance is vastly different.
Manufactured products can absorb water and deteriorate under freeze–thaw cycles, leading to fading, cracking, or surface delamination. In contrast, Stoneyard’s real stone is Harsh Climate Approved (HCA) and freeze-thaw durable. Its color and texture are integral to the stone, formed by New England’s unique geology. The color runs through the entire body of the stone and will never flake, fade, or wear away.
The market reflects a growing preference for authentic materials. Reports show a clear demand for durable, genuine materials in high-impact residential and commercial spaces like fireplaces.
When you choose real New England stone for your DIY fireplace, you are choosing permanence. The stone will develop a natural patina over decades, adding character and real resale value that no man-made imitation can match.
Thin Veneer DIY vs. Full-Bed Stone Masonry
To put the project scope in perspective, this table compares a DIY thin veneer installation to a traditional full-bed masonry job.
| Factor | DIY with Stoneyard Thin Veneer | Professional Full-Bed Stone Masonry |
|---|---|---|
| Weight | Under 15 lbs per square foot. Manageable for one person. | Over 70 lbs per square foot. Requires heavy lifting equipment. |
| Skill Level | Achievable for a skilled DIYer with attention to process. | Requires an experienced, professional stonemason. |
| Structural Needs | Adheres directly to a prepared substrate. No footing required. | Needs a concrete footing or structural ledge to support the weight. |
| Complexity | Similar to tiling; focuses on layout, cutting, and mortar application. | Involves heavy construction, structural engineering, and complex mortar work. |
The differences in weight, structural requirements, and skill level are significant. Thin veneer simplifies the entire process, empowering homeowners to create a lasting, high-performance feature.
Matching Stone Shape and Color to Your Home
Selecting the right real stone veneer for a fireplace is a critical design decision. The shape and color combination will define the character of the room for decades. The goal is to match the stone’s natural texture, lines, and tones to the existing architectural language of the space.
Connecting Shape to Architectural Style
The shape of the stone dictates the overall pattern and texture of the fireplace. Each of Stoneyard’s five shapes are hand-sorted and sawn to a ¾–1¼ inch thickness, and each delivers a distinct aesthetic.
- Ledgestone & Ashlar: For clean, stacked horizontal lines. Ledgestone uses thin, rectilinear strips for a detailed, textured appearance with tight joints. Ashlar has the same rectilinear form but with taller courses for a larger-scale look. Both are used for residential and commercial designs.
- Square & Rectangular: This classic, blocky pattern provides a traditional, ordered layout often seen on colonial-style homes and civic buildings.
- Mosaic: Irregular, angular pieces create the look of a traditional hand-laid fieldstone wall. It is well-suited for rustic designs, chimneys, and natural landscape features.
- Round: This shape offers the weathered, cobblestone style of glacial stones common to historic New England. It is ideal for farmhouse foundations and heritage restorations.
Selecting the Right New England Color Blend
Once a shape is chosen, the next step is selecting a color blend that complements the interior palette. Stoneyard’s five New England color collections are sourced directly from the region’s geology, providing authentic tones that cannot be replicated by manufactured products from competitors like Coronado Stone or Eldorado Stone.
Here is a brief overview of the five color blends.
The image highlights the authentic color variations within each blend, from the warm tones of Colonial Tan to the cool grays of Newport Mist. Because it is real natural stone, the color is consistent throughout each piece and will not fade.
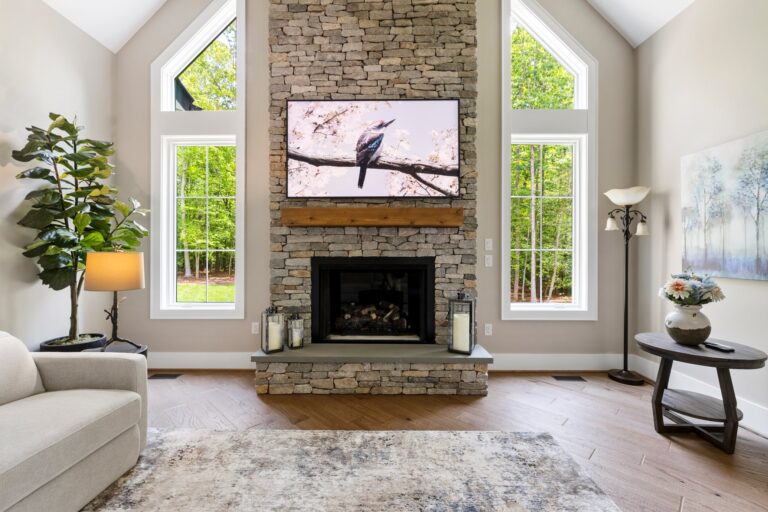
For example, a Boston Blend® Ledgestone fireplace brings rustic warmth with its mix of gray, tan, and brown tones. In contrast, Greenwich Gray Ashlar creates sleek, modern lines perfect for a minimalist living space.
The combination of shape and color provides precise design control. A Colonial Tan Mosaic fireplace can create a coastal feel, while Vineyard Granite Square & Rectangular offers a rugged, traditional look with its gray-pink granite and mica sparkle. We offer more guidance on choosing the perfect stone for your fireplace in another detailed article.
Visualizing the Final Look with Samples
Seeing the stone in your home is a critical step. Natural stone’s appearance changes with lighting conditions. The colors and textures online are a starting point; the stone’s interaction with a room’s natural and artificial light determines its final character.
Ordering free samples allows you to see and feel the authentic product firsthand. Place them against the wall, next to flooring, and near furniture to ensure the chosen blend harmonizes with the decor. This step removes guesswork and ensures long-term satisfaction.
Step-by-Step DIY Fireplace Stone Installation Outline
A successful DIY fireplace stone project depends on careful preparation and a clear understanding of the installation process. Following proper masonry procedure ensures a professional-grade finish that transforms the living space. This section outlines the primary phases of a project using real New England stone.
This visual breaks down the crucial first steps, from design alignment to material verification.
A successful outcome is built on deliberate design choices and material verification from the outset. For a complete technical guide, refer to our installation guide.
1. Surface Preparation
Proper surface preparation is the most critical factor for a strong, durable installation. The objective is to create a clean, stable, and moisture-proof substrate for the stone veneer to adhere to, whether over existing brick or a new framed wall.
For an unpainted brick or concrete block fireplace, ensure the surface is solid and clean. Remove any dust, grease, or efflorescence with a stiff brush and water. If the surface is painted or sealed, it must be covered with metal lath to create a mechanical bond for the mortar.
For framed walls (wood or steel studs), the process is multi-layered:
- Sheathing: Cover studs with a suitable substrate like plywood, OSB, or cement board.
- Moisture Barrier: Apply two layers of building paper or a single layer of a weather-resistive barrier over the sheathing to prevent moisture intrusion.
- Metal Lath: Fasten a corrosion-resistant, self-furring metal lath over the moisture barrier. The lath provides the necessary texture for the mortar to grip.
2. Applying the Scratch Coat
Once the lath is installed, apply the scratch coat. This is a base layer of Type S or N mortar, approximately ½ inch thick, troweled directly onto the lath, ensuring complete coverage of the metal mesh.
While the scratch coat is still wet, use a scarifier or notched trowel to rake horizontal grooves across the surface. These grooves act as a “key,” creating a rough texture that enhances the bond with the setting mortar. Allow the scratch coat to cure for at least 24-48 hours before setting stone.
A properly applied and cured scratch coat creates a solid, stable foundation for the veneer. Rushing this step is a common error that can compromise the entire installation.
3. Placing the Stones
This is where the design vision becomes reality. Lay out a selection of stones on the floor to plan the pattern, mixing sizes and shapes for a natural, balanced appearance and to avoid clustering similar pieces.
Begin the installation at the corners. Stoneyard’s matching corner pieces wrap around edges to provide the appearance of full-depth stone. Setting corners first establishes visual anchor points.
To set each stone:
- Mix a small batch of setting mortar to a smooth, peanut-butter-like consistency.
- Apply a solid ½ inch layer of mortar to the back of each stone (“back-buttering”).
- Press the stone firmly onto the scratch coat with a slight wiggling motion to ensure full mortar coverage and a strong bond.
Work from the bottom up. For grouted joints, leave consistent spacing between stones. For a tight-fit or “dry-stack” look, fit stones closely together. A wet saw or angle grinder may be needed to trim pieces for a precise fit.
4. Grouting Joints and Cleaning the Surface
After the setting mortar has cured for at least 24 hours, fill the joints between the stones (unless a dry-stack installation was performed). Use a grout bag to apply mortar deep into the joints, slightly overfilling them.
When the grout is “thumbprint” hard—firm but not fully cured—use a striking tool or small stick to rake out excess mortar and shape the joints to the desired depth. This step cleanly defines each stone and provides a classic masonry finish.
Finally, use a soft, dry brush to clean loose mortar from the stone faces. Do not use water or acid-based cleaners at this stage, as they can smear the mortar and permanently stain the natural stone. For more technical tips, check out our guide on how to add stone veneer on a fireplace.
Modern fabrication has made real natural stone more accessible for DIY projects than ever before. While focused on a fireplace, it can be helpful to review how similar materials are applied elsewhere. For example, guides on installing stone cladding for exterior walls can provide insights into achieving a durable, high-quality finish.
Real Stone vs. Manufactured Stone: A Factual Comparison
When planning a DIY fireplace project, a primary decision is the stone itself. Manufactured concrete products are often marketed as an easy substitute, but achieving a lasting, high-performance result requires understanding the material differences.
So-called “manufactured stone” from brands like Eldorado Stone or Cultured Stone is not stone; it is concrete. The material is poured into molds made from real stones and painted with pigments to mimic natural stone. While it may look similar from a distance, the illusion fades upon closer inspection and over time.
The most significant issue with these concrete products is that their color is only surface-deep. With exposure to UV light, weather, or daily wear, these pigments can fade, chip, and flake away, revealing the dull, gray concrete underneath.
Material Integrity and Durability
This is where real natural stone outperforms imitations. Our real natural thin stone veneer is 100% natural stone, quarried in New England and sawn thin at our facility in Littleton, MA. The color is not a coating; it runs through the entire body of each piece.
This is a critical performance detail. Because the color is integral to the stone’s geology, it will never fade. A Stoneyard stone fireplace will not look worn in ten years; it will develop a natural patina that improves with age. This is something a concrete product cannot replicate.
Natural New England stone veneer delivers multi-decade performance with minimal maintenance and no color fading. Its dense, solid structure ensures it becomes a permanent, high-value feature of the home.
The demand for authentic materials continues to grow, with the stone veneer market report showing a clear preference for durability and authenticity in high-impact projects like fireplaces.
Real Natural Stone vs. Manufactured Faux Stone
| Attribute | Stoneyard Natural Thin Stone Veneer | Manufactured Stone (Eldorado, Cultured Stone) |
|---|---|---|
| Material Composition | 100% real, quarried New England stone. Made in the USA. | Concrete aggregate mixed with pigments. |
| Color Permanence | Color is integral to the stone; it will never fade. | Surface-level pigments that can chip, fade, or wear off. |
| Durability | Extremely durable, dense, and low-absorption. Harsh Climate Approved. | Porous concrete can absorb water, leading to cracking in freeze-thaw cycles. |
| Long-Term Value | Adds significant, permanent resale value to a home. | Can detract from value as it ages and its artificial nature becomes apparent. |
| Authenticity | Each piece is unique with natural color and texture variations. | Cast from molds, leading to repetitive patterns and an artificial appearance. |
Ultimately, while manufactured products attempt to imitate the look of real stone, they cannot replicate its density, longevity, or authentic character.
Built for New England Winters (And Everywhere Else)
New England weather demands materials that can withstand harsh freeze-thaw cycles. Manufactured stone often fails this test. Because it is porous, it absorbs water. When that water freezes and expands, it can cause the material to crack, crumble, or delaminate from the wall.
All Stoneyard products are Harsh Climate Approved (HCA). Our natural stone has an extremely low water absorption rate, making it immune to freeze-thaw damage. A fireplace built with our stone will look the same after 20 winters as it did on the day of installation. The installation labor is similar, but the permanence of real stone is unmatched.
Long-Term Value and Authenticity
While manufactured stone may have a lower initial cost, it represents a short-term solution. A fireplace built with genuine New England stone is a premium upgrade that adds tangible, lasting value to a home. Appraisers and homebuyers recognize it as a permanent, high-quality feature.
Conversely, a fireplace made with faux stone can detract from a home’s value over time as it fades and deteriorates. The authentic character of real stone—with its unique textures and subtle variations—cannot be replicated in a factory.
Choosing Stoneyard’s real thin stone veneer for your diy fireplace stone project is an investment in permanence, authentic beauty, and unmatched performance.
Explore the full Stoneyard Thin Stone Veneer Collection — real New England stone, made in the USA.
Ready to see for yourself? Order free samples at https://stoneyard.com/stone-samples/ or schedule a virtual showroom visit at https://stoneyard.com/contact/.
Gathering Your Tools and Materials
A successful DIY fireplace project hinges on preparation. Having the correct equipment and materials organized before starting is the difference between a smooth installation and a project filled with delays. Assembling a proper tool kit and accurately estimating materials are the first critical steps.

The screenshot above shows Stoneyard’s online tool that removes the guesswork from material estimation. Using a resource like this ensures an accurate order, preventing material shortages mid-project.
Essential Tools for the Job
Working with real natural stone requires specific masonry tools. Unlike softer, manufactured concrete products, authentic New England stone is dense and requires robust equipment for proper cutting and shaping.
- Wet Saw with Diamond Blade: This is non-negotiable for achieving clean, precise cuts for a professional finish.
- Angle Grinder: Necessary for smaller adjustments and fine-tuning, such as shaping curves or fitting a stone around a mantel bracket.
- Masonry Trowels: A collection of pointed and margin trowels is essential for applying mortar and “buttering” the stones.
- Grout Bag: This heavy-duty tool applies mortar neatly into the joints between stones for a clean finish.
- Safety Gear: Safety glasses, gloves, and a dust mask are mandatory when cutting stone or mixing mortar.
Materials Checklist
The materials list extends beyond the stone itself. Each component plays a vital role in the structural integrity and long-term durability of the fireplace surround.
- Stoneyard Thin Stone Veneer: The primary material. Be sure to order both flat pieces and matching corner pieces for all outside corners.
- Mortar: A Type S or Type N mortar mix is required for both the scratch coat and for setting the stone.
- Moisture Barrier: For installations over framed walls, at least one layer of a code-compliant, weather-resistive barrier is needed.
- Metal Lath: A corrosion-resistant, self-furring lath is critical to give the scratch coat a surface to grip.
- Fasteners: Use galvanized nails or screws rated for securing metal lath to the wall substrate (e.g., wood studs, cement board).
Pro Tip: Before placing an order, use Stoneyard’s online Thin Veneer Material Calculator. A precise estimate for stone and corner pieces is the best way to manage your budget and ensure a smooth project workflow.
Plan for waste management as well. The project will generate some off-cuts and packaging. A guide to recycling aggregates can offer practical tips. Proper organization from the beginning makes the project a rewarding experience.
Answering Your DIY Fireplace Project Questions
Even a well-planned DIY fireplace project can present questions. Addressing these common issues upfront ensures a smooth installation and a professional result. Here are frequently asked questions from homeowners, with builder-level advice for working with authentic New England stone.
Can I Install Thin Stone Veneer Directly Over My Existing Brick Fireplace?
Yes, in most cases, this is an excellent method for updating an old fireplace.
If the existing brick is structurally sound, clean, and unpainted, you can apply a bonding agent and then a scratch coat directly onto the surface. This provides a solid, grippy substrate for the mortar.
If the brick is painted or deteriorating, an extra step is required. The entire surface must be covered with metal lath first. This creates a new mechanical bond for the mortar and stone, ensuring the new veneer is not dependent on a compromised underlying surface.
Pro Tip: Always confirm that the original fireplace structure can handle the added weight. Our natural stone veneer is lightweight, typically under 14 lbs per square foot, but confirming structural capacity is always a good practice.
What Tools Do I Need to Cut Natural Stone Veneer?
Real stone is dense and requires power tools for clean, precise cuts. It cannot be shaped with hand tools like softer, man-made concrete alternatives.
For straight cuts, a wet saw with a diamond blade is essential for achieving professional-looking edges. For more complex cuts, such as shaping a piece to fit around a mantel or cutting custom angles, an angle grinder with a diamond blade is required. These two tools allow for precise fitting of each piece, whether for a tight-fit or a grouted joint style.
What Is the Design Difference Between Ledgestone and Ashlar?
Both Ledgestone and Ashlar provide a stacked-stone appearance but create different aesthetics. The choice depends on the desired scale and visual texture.
- Ledgestone consists of thin, linear strips of stone with varying heights. This creates fine texture and strong horizontal lines, ideal for a detailed, contemporary look.
- Ashlar features taller course heights, giving it a more substantial, block-like appearance. This style is well-suited for larger fireplaces where a bolder architectural statement is desired.
Ledgestone delivers intricate detail, while Ashlar provides a more powerful presence.
Why Is Real Stone a Better Choice Than Manufactured Stone for a Fireplace?
For a fireplace, real natural stone veneer offers superior durability, heat resistance, and authenticity compared to manufactured concrete products from brands like Eldorado Stone or Cultured Stone.
The color in real stone is integral to its geological composition and runs through each piece. This means it will never fade, chip, or peel, even with constant exposure to heat from the firebox.
Manufactured stone’s color comes from surface-level pigments that can degrade, fade, or delaminate over time, especially with heat exposure. Furthermore, real New England stone adds tangible, permanent resale value to a home. It is an investment in timeless beauty and authenticity that provides decades of performance.
Explore the full Stoneyard Thin Stone Veneer Collection — real New England stone, made in the USA. Order free samples at https://stoneyard.com/stone-samples/ or schedule a virtual showroom visit at https://stoneyard.com/contact/.